(→Origin) Tags: Visual edit apiedit |
No edit summary |
||
| (10 intermediate revisions by 5 users not shown) | |||
| Line 1: | Line 1: | ||
[[File:Maze-Aerial.jpg|thumb|384x384px|''The whole Maze as seen in the film after the Gladers escape.'']] |
[[File:Maze-Aerial.jpg|thumb|384x384px|''The whole Maze as seen in the film after the Gladers escape.'']] |
||
| − | '''The Maze''' was Phase One of [[ |
+ | '''The Maze''' was Phase One of the [[The Trials|Trials]] created by [[WICKED]] personnel for the [[Gladers]] to solve. |
[[File:Glade and Maze.JPG|thumb|220x220px|''The 8 different sections of the Maze.'']] |
[[File:Glade and Maze.JPG|thumb|220x220px|''The 8 different sections of the Maze.'']] |
||
== Description == |
== Description == |
||
| − | In the books, there are two [[The Maze|Mazes]], one for [[Group A]] and one for [[Group B]]. Both are built deep into the bedrock that lies under the main buildings of [[WICKED Complex|WICKED's headquarters]]. Since they are underground, the sun and sky are simulations and it is always sunny (until [[ |
+ | In the books, there are two [[The Maze|Mazes]], one for [[Gladers|Group A]] and one for [[Group B]]. Both are built deep into the bedrock that lies under the main buildings of [[WICKED Complex|WICKED's headquarters]]. Since they are underground, the sun and sky are simulations and it is always sunny (until the [[The Ending|Ending]] is triggered). The Mazes can be entered and exited through the [[The Griever Hole|Griever Hole]].[[File:32.jpg|left|thumb|274x274px]] |
| − | The two Mazes are identical in design and described as giant labyrinths. They are divided into eight sections surrounding [[ |
+ | The two Mazes are identical in design and described as giant labyrinths. They are divided into eight sections surrounding the [[The Glade|Glade]]. Every night, the [[The Walls|Walls]] of the Maze change, repeating the same pattern every month. This pattern is a code. In the book, the code consists of keywords which are formed by the walls of the eight sections at the rate of one letter a day. The Gladers had kept records on paper of the Maze patterns for a year or so, and they knew that each month the patterns repeated. [[Thomas]] discovered that letters could be found by placing the maps of the eight sections from the same day over each other. When a month's worth of maps were examined, they discovered that the letters formed the keywords FLOAT – CATCH – BLEED – DEATH – STIFF – PUSH. |
| − | Eventually Thomas realized that the keywords were a shut-down code for the Maze. Once the Gladers broke out of the Maze and made it into the Griever hole, [[Teresa]] entered the keywords into a computer. All of them worked except the last one. [[Chuck]] realized that "push" was not a word to be typed, but instead referred to a button below the computer console that read KILL THE MAZE. Thomas pushed it and successfully shut down the Maze. |
+ | Eventually Thomas realized that the keywords were a shut-down code for the Maze. Once the Gladers broke out of the Maze and made it into the Griever hole, [[Teresa Agnes|Teresa]] entered the keywords into a computer. All of them worked except the last one. [[Chuck]] realized that "push" was not a word to be typed, but instead referred to a button below the computer console that read KILL THE MAZE. Thomas pushed it and successfully shut down the Maze. |
== Origin == |
== Origin == |
||
| − | In The Fever |
+ | In ''[[The Fever Code]]'', Thomas and Teresa helped WICKED construct the Maze for [[Gladers|Group A]], working on it until it was complete before entering themselves. [[Aris Jones|Aris]] and [[Rachel]], two other teen subjects, worked on the [[Group B]] Maze. It was due to Aris, Rachel, Teresa and Thomas's incredible intelligence that WICKED used them to help build the Mazes. After his friends were sent in, Thomas observed them using [[Beetle Blade]]s before being sent in the Maze himself by his request (although his memory was wiped without his consent). In the epilogue of ''The Fever Code'', it is revealed that Teresa and Aris kept their memories when entering their Mazes, coordinating everything telepathically on WICKED's behalf. |
| + | |||
| + | == The Death Cure == |
||
| + | The Maze reappears in the final book, when Thomas realises that WICKED has hidden the captured Immunes inside of its walls. After he and his friends find the Immunes,Thomas starts talking only to be cut off by a loud crack; a section of stone near the East Door breaks off and kills a bunch of people. Thomas realises that the Right Arm has set off explosives, so he and his friends and the rest of the Immunes find a maintenance room, where Thomas successfully killed the Grievers that are inside the building. After finding a Flat Trans, Thomas and his friends fight and kill Janson when he arrives with some guards. They jump into the Flat Trans, while the Maze keeps on splintering around them. |
||
== Portrayal in the movies == |
== Portrayal in the movies == |
||
| − | In [[The Maze Runner (film)| |
+ | In the [[The Maze Runner (film)|Maze Runner film]], the Maze is not underground, and the sun and sky are the real ones. Hence, the Gladers experience fluctuations of weather (rainfall, temperature change, etc.) In addition, the Mazes for both Group A and Group B are designed quite differently from the book. In the book, Group A's Maze is a square shape, but in the film, the Maze is circular. In addition, the film's Maze is not divided into eight distinct sections, but is rather divided into three circular sections. The difference between each section is the density of the Maze paths, with the inner ring closest to the center (the Glade for Group A and the Spring for Group B) having the greatest density of paths. The next two rings have fewer paths. The outermost ring is also divided into eight sections, which seems to correspond to the way the Maze in the book is divided. |
| + | |||
| + | Instead of the keyword sequence mentioned above, the Maze's escape code in the film is the opening sequence of the Maze sections: 71526483. In addition to this, the Griever hole as such does not exist; instead, there is a secret room in the Maze they happen to find. |
||
| + | |||
| + | Group B's Maze in the movie is itself significantly different from Group A's Maze (unlike in the books, where the two Mazes are identical). Whereas Group A's Maze remains flat throughout, ''[[The Scorch Trials Official Graphic Novel Prelude]]'' (canon to the movie universe) shows that the outer section of Group B's Maze becomes vertical. The climate between the two Mazes in the film universe also differs. While Group A's Maze enjoyed a temperate climate with their central living area filled with deciduous trees, Group B's Maze endured a far colder climate, with the Maze walls constructed of ice. They also had extensive snowfall, and their Maze center area was filled with coniferous trees. |
||
== Pictures == |
== Pictures == |
||
Revision as of 04:36, 18 March 2020
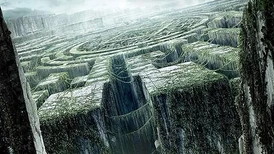
The whole Maze as seen in the film after the Gladers escape.
The Maze was Phase One of the Trials created by WICKED personnel for the Gladers to solve.
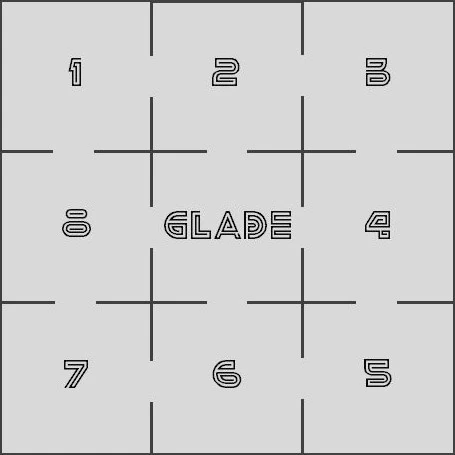

The 8 different sections of the Maze.
Description
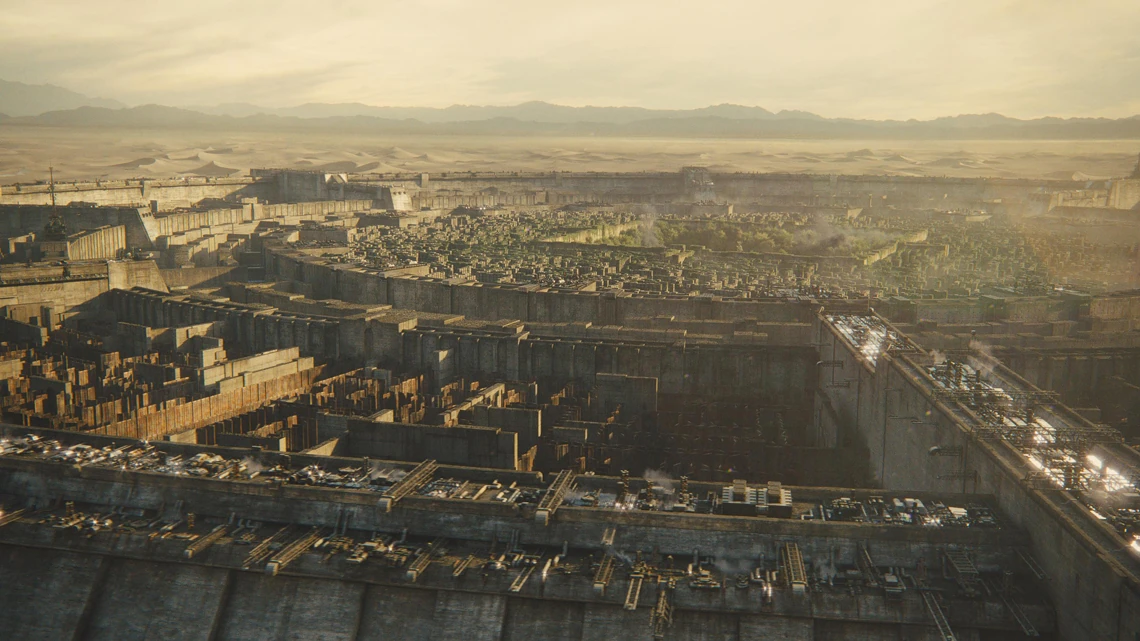
In the books, there are two Mazes, one for Group A and one for Group B. Both are built deep into the bedrock that lies under the main buildings of WICKED's headquarters. Since they are underground, the sun and sky are simulations and it is always sunny (until the Ending is triggered). The Mazes can be entered and exited through the Griever Hole.

The two Mazes are identical in design and described as giant labyrinths. They are divided into eight sections surrounding the Glade. Every night, the Walls of the Maze change, repeating the same pattern every month. This pattern is a code. In the book, the code consists of keywords which are formed by the walls of the eight sections at the rate of one letter a day. The Gladers had kept records on paper of the Maze patterns for a year or so, and they knew that each month the patterns repeated. Thomas discovered that letters could be found by placing the maps of the eight sections from the same day over each other. When a month's worth of maps were examined, they discovered that the letters formed the keywords FLOAT – CATCH – BLEED – DEATH – STIFF – PUSH.
Eventually Thomas realized that the keywords were a shut-down code for the Maze. Once the Gladers broke out of the Maze and made it into the Griever hole, Teresa entered the keywords into a computer. All of them worked except the last one. Chuck realized that "push" was not a word to be typed, but instead referred to a button below the computer console that read KILL THE MAZE. Thomas pushed it and successfully shut down the Maze.
Origin
In The Fever Code, Thomas and Teresa helped WICKED construct the Maze for Group A, working on it until it was complete before entering themselves. Aris and Rachel, two other teen subjects, worked on the Group B Maze. It was due to Aris, Rachel, Teresa and Thomas's incredible intelligence that WICKED used them to help build the Mazes. After his friends were sent in, Thomas observed them using Beetle Blades before being sent in the Maze himself by his request (although his memory was wiped without his consent). In the epilogue of The Fever Code, it is revealed that Teresa and Aris kept their memories when entering their Mazes, coordinating everything telepathically on WICKED's behalf.
The Death Cure
The Maze reappears in the final book, when Thomas realises that WICKED has hidden the captured Immunes inside of its walls. After he and his friends find the Immunes,Thomas starts talking only to be cut off by a loud crack; a section of stone near the East Door breaks off and kills a bunch of people. Thomas realises that the Right Arm has set off explosives, so he and his friends and the rest of the Immunes find a maintenance room, where Thomas successfully killed the Grievers that are inside the building. After finding a Flat Trans, Thomas and his friends fight and kill Janson when he arrives with some guards. They jump into the Flat Trans, while the Maze keeps on splintering around them.
Portrayal in the movies
In the Maze Runner film, the Maze is not underground, and the sun and sky are the real ones. Hence, the Gladers experience fluctuations of weather (rainfall, temperature change, etc.) In addition, the Mazes for both Group A and Group B are designed quite differently from the book. In the book, Group A's Maze is a square shape, but in the film, the Maze is circular. In addition, the film's Maze is not divided into eight distinct sections, but is rather divided into three circular sections. The difference between each section is the density of the Maze paths, with the inner ring closest to the center (the Glade for Group A and the Spring for Group B) having the greatest density of paths. The next two rings have fewer paths. The outermost ring is also divided into eight sections, which seems to correspond to the way the Maze in the book is divided.
Instead of the keyword sequence mentioned above, the Maze's escape code in the film is the opening sequence of the Maze sections: 71526483. In addition to this, the Griever hole as such does not exist; instead, there is a secret room in the Maze they happen to find.
Group B's Maze in the movie is itself significantly different from Group A's Maze (unlike in the books, where the two Mazes are identical). Whereas Group A's Maze remains flat throughout, The Scorch Trials Official Graphic Novel Prelude (canon to the movie universe) shows that the outer section of Group B's Maze becomes vertical. The climate between the two Mazes in the film universe also differs. While Group A's Maze enjoyed a temperate climate with their central living area filled with deciduous trees, Group B's Maze endured a far colder climate, with the Maze walls constructed of ice. They also had extensive snowfall, and their Maze center area was filled with coniferous trees.
Pictures
")
")
")
")
")
")
")
")
")
")
")
")
")
")
")